08 调制 Crush
CRUSH map:主要记录存储设备列表、故障域树状结构、存储数据时如何利用树状结构的规则。
RULE一般分为三步走 : take–>choose N–>emit。Take这一步负责选择一个根节点,这个根节点不一定是root,也可以是任何一个Bucket。choose N做的就是按照每个Bucket的weight以及每个choose语句选出符合条件的Bucket,并且,下一个choose的选择对象为上一步得到的结果。emit就是输出最终结果,相当于出栈。
take:指定入口
choose:从指定的入口开始挑选符合需求的OSD的集合。副本池和纠删码池由于使用不同的备份策略,所以它们使用不同的挑选算法。
- 副本池:firstn,表示挑选出前n个(可能返回符合条件的n+m个osd,但是只挑选前面的n个)
- 纠删码池:indep,“独立的”之意,严格返回k+m个osd
firstn和indep都是深度优先遍历算法。优先纵向深度查询而不是横向优先。
- chooseleaf:直接选择叶子节点osd,而不是从根开始遍历。
- straw:抽签算法,抽出最长签(桶算法:从一个桶中挑选出下级子桶的算法),优化后的straw算法为straw2。
- emit:输出挑选结果
注意: 大多数情况下,你都不需要修改默认规则。新创建存储池的默认规则集是 0 。
规则格式如下:
rule <rulename> {

        ruleset <ruleset>
        type [ replicated | erasure ]
        min_size <min-size>
        max_size <max-size>
        step take <bucket-type>
        step [choose|chooseleaf] [firstn|indep] <N> <bucket-type>
        step emit
}
参数说明:
ruleset:区分一条规则属于某个规则集的手段。给存储池设置规则集后激活。type:规则类型,目前仅支持replicated和erasure,默认是replicated。min_size:可以选择此规则的存储池最小副本数。不满足则无法使用此规则。max_size:可以选择此规则的存储池最大副本数。step take <bucket-name>:选取起始的桶名,并迭代到树底。step choose firstn {num} type {bucket-type}:选取指定类型桶的数量,这个数字通常是存储池的副本数(即 pool size )。如果{num} == 0, 选择pool-num-replicas个桶(所有可用的);如果{num} > 0 && < pool-num-replicas,就选择那么多的桶;如果{num} < 0,它意味着选择pool-num-replicas - {num}个桶。step chooseleaf firstn {num} type {bucket-type}:选择{bucket-type}类型的桶集合,并从各桶的子树里选择一个叶子节点。桶集合的数量通常是存储池的副本数(即 pool size )。如果{num} == 0,选择pool-num-replicas个桶(所有可用的);如果{num} > 0 && < pool-num-replicas,就选择那么多的桶;如果{num} < 0,它意味着选择pool-num-replicas - {num}个桶。step emit:输出当前值并清空堆栈。通常用于规则末尾,也适用于相同规则应用到不同树的情况。
这里再举个简单的例子,也就是我们最常见的三个主机每个主机三个OSD的结构:
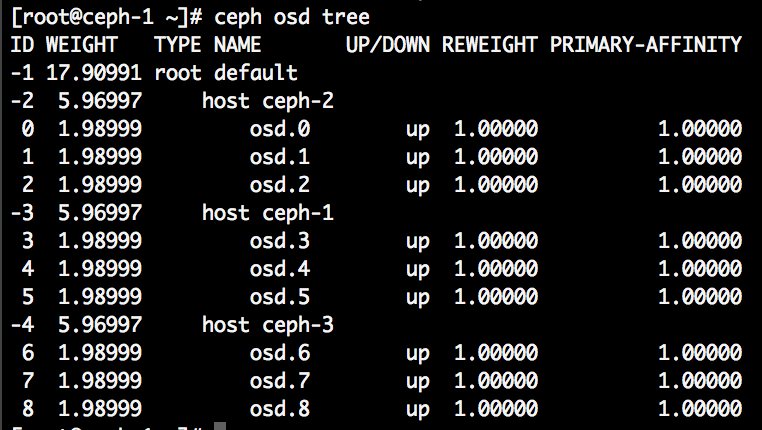
我们要从三个host下面各选出一个OSD,使得三个副本各落在一个host上,这时候,就能保证挂掉两个host,还有一个副本在运行了,那么这样的RULE就形如:
- take(root) ============> [default] 注意是根节点的名字
- choose(3, host) ========> [ceph-1, ceph-2, ceph-3]
- choose(1, osd) ========> [osd.3, osd.1, osd.8]
- emit()
这里我们来简单总结一下:我们把一个生产环境的机房画成一个树状结构,最下面一层为OSD层,每个OSD有自己的权重,OSD的上面由host/rack/row/room/root等等节点构成,每个节点的权重都是由下层的节点累加而成,CRUSH选择每个节点的算法(straw)都是一样的,用它们的weight乘以一个随机数取其中最大,只是我们通过choose的语句来判断选择的节点类型和个数。最后不要忘了选出来的结果是PG->OSD的映射,比如:pg 0.a2 ---> [osd.3, osd.1, osd.8]和pg 0.33 ---> [osd.0, osd.5, osd.7], 每个PG都有自己到OSD的映射关系,这个关系用公式总结就是: CRUSH(pg_id) ---> [osd.a, osd.b ...osd.n]。
choose和chooseleaf:
还是简单的讲解下这句step chooseleaf firstn 0 type host, 实际的RULE里面分为choose和chooseleaf两种:
choose用于选择多个Bucket,Bucket是最终选择结果,相当于choose(3, Bucket)。chooseleaf用于选择多个Bucket,并在这些Bucket下各选出一个OSD,OSD是最终选择结果,相当于choose(3, Bucket) + choose(1, osd)。
此外:
type后面的host就是要选择的Bucket类型。firstn后面的0,是选择的副本数,0等于副本数,也就是3的意思。
所以Sage论文中的图,对应到实际CRUSH的RULE就是:
rule Sage_Paper {
	ruleset 0
	type replicated
	min_size 1
	max_size 10
	step take root
	step choose firstn 1 type row  #选择1个类型为row的bucket
	step chooseleaf firstn 0 type cabinet #先选择cabinet类型的bucket(个数为0表示副本数),然后在每个cabinet中选择1个osd
	step emit
}
其他代表性示例:
rule replicated_ruleset2 {  #从2个root下分别选择出2个osd,一共选择4个osd(即便pood的副本数设置为5,该crush_ruleset也只能会选择出4个osd集合)
        ruleset 2
        type replicated
        min_size 1
        max_size 10
        step take default
        step chooseleaf firstn 2 type host  #先从rootdefault选出2个osd
        step emit
        step take new_root
        step chooseleaf firstn 2 type host  #再从root=new_root选择出2个osd
        step emit
}
[root@node-1 ~]# ceph osd crush tree  #或ceph osd tree
ID CLASS WEIGHT  TYPE NAME
-1       1.17178 root default
-3       0.39059     host node-1
 0   hdd 0.19530         osd.0
 5   hdd 0.19530         osd.5
-5       0.39059     host node-2
 1   hdd 0.19530         osd.1
 4   hdd 0.19530         osd.4
-7       0.39059     host node-3
 2   hdd 0.19530         osd.2
 3   hdd 0.19530         osd.3


 # 查看crush规则详情
[root@node-1 ~]# ceph osd crush dump
{
    "devices": [    #当前rados集群中的设备列表
        {
            "id": 0,
            "name": "osd.0",
            "class": "hdd"
        },
        {
            "id": 1,
            "name": "osd.1",
            "class": "hdd"
        },
        {
            "id": 2,
            "name": "osd.2",
            "class": "hdd"
        },
        {
            "id": 3,
            "name": "osd.3",
            "class": "hdd"
        },
        {
            "id": 4,
            "name": "osd.4",
            "class": "hdd"
        },
        {
            "id": 5,
            "name": "osd.5",
            "class": "hdd"
        }
    ],
    "types": [    # 类型级别:bucket类型
        {
            "type_id": 0,
            "name": "osd"
        },
        {
            "type_id": 1,
            "name": "host"
        },
        {
            "type_id": 2,
            "name": "chassis"
        },
        {
            "type_id": 3,
            "name": "rack"
        },
        {
            "type_id": 4,
            "name": "row"
        },
        {
            "type_id": 5,
            "name": "pdu"
        },
        {
            "type_id": 6,
            "name": "pod"
        },
        {
            "type_id": 7,
            "name": "room"
        },
        {
            "type_id": 8,
            "name": "datacenter"
        },
        {
            "type_id": 9,
            "name": "zone"
        },
        {
            "type_id": 10,
            "name": "region"
        },
        {
            "type_id": 11,
            "name": "root"
        }
    ],
    "buckets": [     #桶配置,数据组织形式
        {
            "id": -1,
            "name": "default",    #名称为default的bucket
            "type_id": 11,        # 类型为11,即类型为“root”
            "type_name": "root",  #当前桶的类型
            "weight": 76794,
            "alg": "straw2",  #桶算法
            "hash": "rjenkins1",  ## 采用的hash算法来对object进行hash计算
            "items": [            # 此bucket下的条目
                {
                    "id": -3,     # -3表示一个host,可以在后面查看到
                    "weight": 25598,
                    "pos": 0
                },
                {
                    "id": -5,
                    "weight": 25598,
                    "pos": 1
                },
                {
                    "id": -7,
                    "weight": 25598,
                    "pos": 2
                }
            ]
        },
        {
            "id": -2,
            "name": "default~hdd",
            "type_id": 11,
            "type_name": "root",
            "weight": 76794,
            "alg": "straw2",
            "hash": "rjenkins1",
            "items": [
                {
                    "id": -4,
                    "weight": 25598,
                    "pos": 0
                },
                {
                    "id": -6,
                    "weight": 25598,
                    "pos": 1
                },
                {
                    "id": -8,
                    "weight": 25598,
                    "pos": 2
                }
            ]
        },
        {
            "id": -3,
            "name": "node-1",
            "type_id": 1,
            "type_name": "host",
            "weight": 25598,
            "alg": "straw2",
            "hash": "rjenkins1",
            "items": [
                {
                    "id": 0,
                    "weight": 12799,
                    "pos": 0
                },
                {
                    "id": 5,
                    "weight": 12799,
                    "pos": 1
                }
            ]
        },
        {
            "id": -4,
            "name": "node-1~hdd",
            "type_id": 1,
            "type_name": "host",
            "weight": 25598,
            "alg": "straw2",
            "hash": "rjenkins1",
            "items": [
                {
                    "id": 0,
                    "weight": 12799,
                    "pos": 0
                },
                {
                    "id": 5,
                    "weight": 12799,
                    "pos": 1
                }
            ]
        },
        {
            "id": -5,
            "name": "node-2",
            "type_id": 1,
            "type_name": "host",
            "weight": 25598,
            "alg": "straw2",
            "hash": "rjenkins1",
            "items": [
                {
                    "id": 1,
                    "weight": 12799,
                    "pos": 0
                },
                {
                    "id": 4,
                    "weight": 12799,
                    "pos": 1
                }
            ]
        },
        {
            "id": -6,
            "name": "node-2~hdd",
            "type_id": 1,
            "type_name": "host",
            "weight": 25598,
            "alg": "straw2",
            "hash": "rjenkins1",
            "items": [
                {
                    "id": 1,
                    "weight": 12799,
                    "pos": 0
                },
                {
                    "id": 4,
                    "weight": 12799,
                    "pos": 1
                }
            ]
        },
        {
            "id": -7,
            "name": "node-3",
            "type_id": 1,
            "type_name": "host",
            "weight": 25598,
            "alg": "straw2",
            "hash": "rjenkins1",
            "items": [
                {
                    "id": 2,
                    "weight": 12799,
                    "pos": 0
                },
                {
                    "id": 3,
                    "weight": 12799,
                    "pos": 1
                }
            ]
        },
        {
            "id": -8,
            "name": "node-3~hdd",
            "type_id": 1,
            "type_name": "host",
            "weight": 25598,
            "alg": "straw2",
            "hash": "rjenkins1",
            "items": [
                {
                    "id": 2,
                    "weight": 12799,
                    "pos": 0
                },
                {
                    "id": 3,
                    "weight": 12799,
                    "pos": 1
                }
            ]
        }
    ],
    "rules": [             # 定义crush_ruleset
        {
            "rule_id": 0,
            "rule_name": "replicated_rule",
            "ruleset": 0,
            "type": 1,  #冗余类型
            "min_size": 1,  #冗余个数最小值
            "max_size": 10,
            "steps": [
                {
                    "op": "take",
                    "item": -1,
                    "item_name": "default"
                },
                {
                    "op": "chooseleaf_firstn",
                    "num": 0,
                    "type": "host"
                },
                {
                    "op": "emit"
                }
            ]
        }
    ],
    "tunables": {
        "choose_local_tries": 0,
        "choose_local_fallback_tries": 0,
        "choose_total_tries": 50,
        "chooseleaf_descend_once": 1,
        "chooseleaf_vary_r": 1,
        "chooseleaf_stable": 1,
        "straw_calc_version": 1,
        "allowed_bucket_algs": 54,
        "profile": "jewel",
        "optimal_tunables": 1,
        "legacy_tunables": 0,
        "minimum_required_version": "jewel",
        "require_feature_tunables": 1,
        "require_feature_tunables2": 1,
        "has_v2_rules": 0,
        "require_feature_tunables3": 1,
        "has_v3_rules": 0,
        "has_v4_buckets": 1,
        "require_feature_tunables5": 1,
        "has_v5_rules": 0
    },
    "choose_args": {}
}
There are six main sections to a CRUSH Map.
- tunables: The preamble at the top of the map described any tunables for CRUSH behavior that vary from the historical/legacy CRUSH behavior. These correct for old bugs, optimizations, or other changes in behavior that have been made over the years to improve CRUSH’s behavior.
- devices: Devices are individual
ceph-osddaemons that can store data. - types: Bucket
typesdefine the types of buckets used in your CRUSH hierarchy. Buckets consist of a hierarchical aggregation of storage locations (e.g., rows, racks, chassis, hosts, etc.) and their assigned weights. - buckets: Once you define bucket types, you must define each node in the hierarchy, its type, and which devices or other nodes it contains.
- rules: Rules define policy about how data is distributed across devices in the hierarchy.
- choose_args: Choose_args are alternative weights associated with the hierarchy that have been adjusted to optimize data placement. A single choose_args map can be used for the entire cluster, or one can be created for each individual pool.
#ceph osd getcrushmap导出的crush map
ceph osd getcrushmap -o /tmp/mycrushmap.bin
crushtool -d /tmp/mycrushmap.bin -o /tmp/mycrushmap.txt

[root@stor01 ~]# cat /tmp/mycrushmap.txt
# begin crush map
tunable choose_local_tries 0
tunable choose_local_fallback_tries 0
tunable choose_total_tries 50
tunable chooseleaf_descend_once 1
tunable chooseleaf_vary_r 1
tunable chooseleaf_stable 1
tunable straw_calc_version 1
tunable allowed_bucket_algs 54

# devices : 当前rados集群中的设备列表
device 0 osd.0 class ssd
device 1 osd.1 class ssd
device 2 osd.2 class ssd
device 3 osd.3 class ssd
device 4 osd.4 class ssd
device 5 osd.5 class ssd
device 6 osd.6 class ssd
device 7 osd.7 class ssd

# types:bucket类型
type 0 osd
type 1 host
type 2 chassis
type 3 rack
type 4 row
type 5 pdu
type 6 pod
type 7 room
type 8 datacenter
type 9 zone
type 10 region
type 11 root

# buckets:桶配置
host stor01 {
	id -3		# do not change unnecessarily
	id -4 class ssd		# do not change unnecessarily
	# weight 0.195
	alg straw2 #桶算法
	hash 0	# rjenkins1,采用的hash算法来对object进行hash计算
	item osd.0 weight 0.078  #定义桶子项
	item osd.1 weight 0.117
}
host stor02 {
	id -5		# do not change unnecessarily
	id -6 class ssd		# do not change unnecessarily
	# weight 0.195
	alg straw2
	hash 0	# rjenkins1
	item osd.2 weight 0.078
	item osd.3 weight 0.117
}
host stor03 {
	id -7		# do not change unnecessarily
	id -8 class ssd		# do not change unnecessarily
	# weight 0.195
	alg straw2
	hash 0	# rjenkins1
	item osd.4 weight 0.078
	item osd.5 weight 0.117
}
host stor04 {
	id -9		# do not change unnecessarily
	id -10 class ssd		# do not change unnecessarily
	# weight 0.195
	alg straw2
	hash 0	# rjenkins1
	item osd.6 weight 0.078
	item osd.7 weight 0.117
}
root default {  #根节点
	id -1		# do not change unnecessarily
	id -2 class ssd		# do not change unnecessarily
	# weight 0.781
	alg straw2
	hash 0	# rjenkins1
	item stor01 weight 0.195
	item stor02 weight 0.195
	item stor03 weight 0.195
	item stor04 weight 0.195
}

# rules:定义crush_ruleset
rule replicated_rule {
	id 0
	type replicated #冗余类型
	min_size 1   #冗余个数最小值,如果创建的pool的副本数不满足该配置,则不能使用该rule
	max_size 10
	step take default
	step chooseleaf firstn 0 type host
	step emit
}

# end crush map
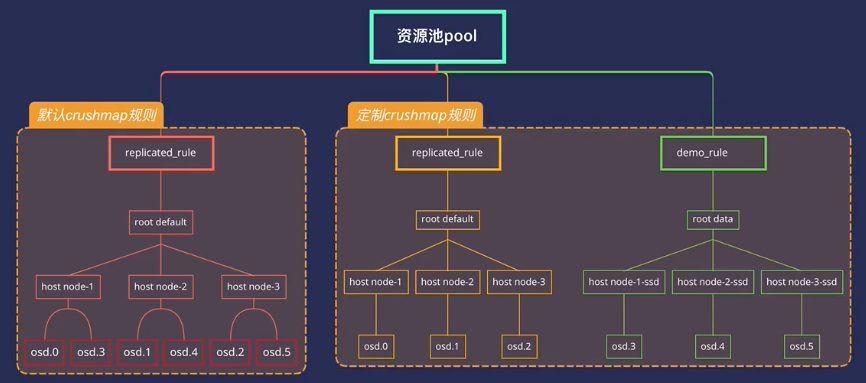
需求:修改默认发crushmap规则,形成图中所示的定制规则。
注意:CRUSH规则变动,会导致数据迁移。
推荐文章:http://xuxiaopang.com/2016/11/08/easy-ceph-CRUSH/
1.1、获取CRUSH MAP
#ceph osd getcrushmap -o {compiled-crushmap-filename}  使用-o指定文件输出路径
[root@node-1 ~]# ceph osd getcrushmap -o crushmap.bin
13
由于CRUSH映射为已编译形式,因此必须首先对其进行反编译,然后才能对其进行编辑。
1.2、反编译CRUSH map
#crushtool -d {compiled-crushmap-filename} -o {decompiled-crushmap-filename}
[root@node-1 ~]# crushtool -d crushmap.bin -o crushmap.txt
[root@node-1 ~]# ls
anaconda-ks.cfg  crushmap.bin  crushmap.txt
1.3、修改规则
vi crushmap.txt
1.4、重新编译crushmap
[root@node-1 ~]# crushtool -c crushmap.txt -o crushmap-new.bin
1.5、应用规则,注入到集群中
[root@node-1 ~]# ceph osd setcrushmap -i crushmap-new.bin
一旦注入,即刻生效。
ceph osd crush add <osdname (id|osd.id)> <float[0.0-]> <args> [<args>...]
# add or update crushmap position and  weight for <name> with <weight> and  location <args>
ceph osd crush add-bucket <name> <type>
# add no-parent (probably root) crush bucket <name> of type <type>
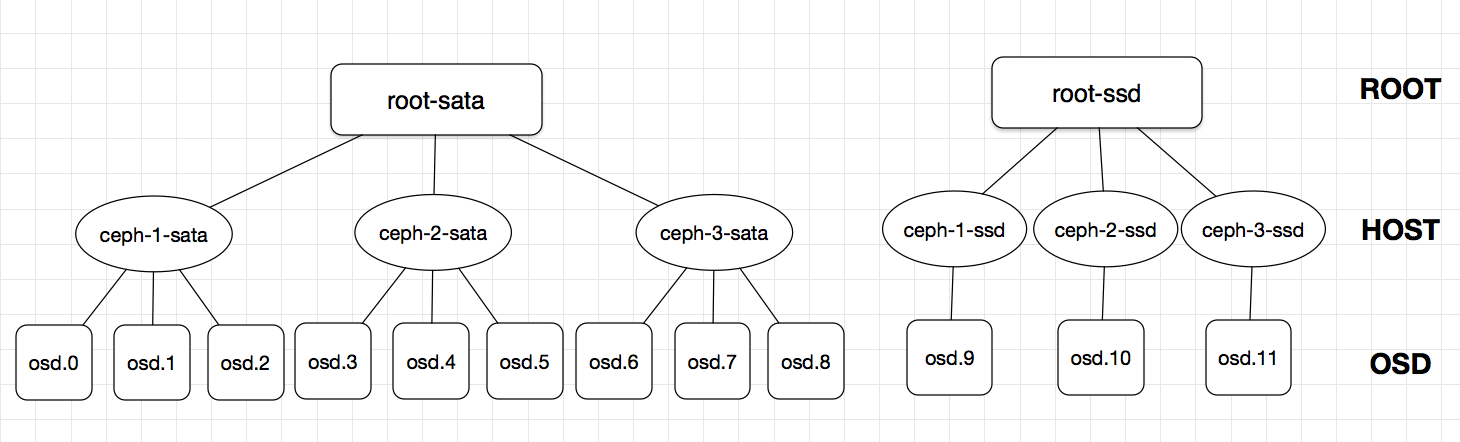
示例:
把刚刚建的12个OSD组成下图所示的架构,这里的root-sata,ceph-1-sata等都是我们虚构出来的,和主机名没有任何关系,但是OSD必须和刚刚部署的顺序一一对应!
创建root和host级别的bucket:
ceph osd crush add-bucket root-sata root
ceph osd crush add-bucket root-ssd root
ceph osd crush add-bucket ceph-1-sata host
ceph osd crush add-bucket ceph-2-sata host
ceph osd crush add-bucket ceph-3-sata host
ceph osd crush add-bucket ceph-1-ssd host
ceph osd crush add-bucket ceph-2-ssd host
ceph osd crush add-bucket ceph-3-ssd host

[root@ceph-1 cluster]# ceph osd tree
ID WEIGHT TYPE NAME        UP/DOWN REWEIGHT PRIMARY-AFFINITY
-9      0 host ceph-3-ssd
-8      0 host ceph-2-ssd
-7      0 host ceph-1-ssd
-6      0 host ceph-3-sata
-5      0 host ceph-2-sata
-4      0 host ceph-1-sata
-3      0 root root-ssd
-2      0 root root-sata
-1      0 root default
 0      0 osd.0                 up  1.00000          1.00000
 1      0 osd.1                 up  1.00000          1.00000
...
再将对应的host移到root下,然后把OSD移到对应的host下面,注意添加OSD时的weight是该OSD的实际大小(2T为2 ,800G为0.8),切勿随意填写!!!指令如下:
ceph osd crush move ceph-1-sata root=root-sata
ceph osd crush move ceph-2-sata root=root-sata
ceph osd crush move ceph-3-sata root=root-sata
ceph osd crush move ceph-1-ssd root=root-ssd
ceph osd crush move ceph-2-ssd root=root-ssd
ceph osd crush move ceph-3-ssd root=root-ssd

ceph osd crush add osd.0 2 host=ceph-1-sata
ceph osd crush add osd.1 2 host=ceph-1-sata
ceph osd crush add osd.2 2 host=ceph-1-sata
ceph osd crush add osd.3 2 host=ceph-2-sata
ceph osd crush add osd.4 2 host=ceph-2-sata
ceph osd crush add osd.5 2 host=ceph-2-sata
ceph osd crush add osd.6 2 host=ceph-3-sata
ceph osd crush add osd.7 2 host=ceph-3-sata
ceph osd crush add osd.8 2 host=ceph-3-sata
ceph osd crush add osd.9 0.8 host=ceph-1-ssd #注意weight是实际容量
ceph osd crush add osd.10 0.8 host=ceph-2-ssd
ceph osd crush add osd.11 0.8 host=ceph-3-ssd


[root@ceph-1 cluster]# ceph osd tree
ID WEIGHT   TYPE NAME            UP/DOWN REWEIGHT PRIMARY-AFFINITY
-3  2.39996 root root-ssd
-7  0.79999     host ceph-1-ssd
 9  0.79999         osd.9             up  1.00000          1.00000
-8  0.79999     host ceph-2-ssd
10  0.79999         osd.10            up  1.00000          1.00000
-9  0.79999     host ceph-3-ssd
11  0.79999         osd.11            up  1.00000          1.00000
-2 18.00000 root root-sata
-4  6.00000     host ceph-1-sata
 0  2.00000         osd.0             up  1.00000          1.00000
 1  2.00000         osd.1             up  1.00000          1.00000
 2  2.00000         osd.2             up  1.00000          1.00000
-5  6.00000     host ceph-2-sata
 3  2.00000         osd.3             up  1.00000          1.00000
 4  2.00000         osd.4             up  1.00000          1.00000
 5  2.00000         osd.5             up  1.00000          1.00000
-6  6.00000     host ceph-3-sata
 6  2.00000         osd.6             up  1.00000          1.00000
 7  2.00000         osd.7             up  1.00000          1.00000
 8  2.00000         osd.8             up  1.00000          1.00000
-1        0 root default
最后,修改CRUSHMAP即可: 我习惯导出crushmap进行操作,十分方便不需要记什么指令。 导出crushmap,并增加一条rule:
ceph osd getcrushmap -o /tmp/crush.bin
crushtool -d /tmp/crush.bin -o /tmp/crush.txt
# -d 的意思是decompile,导出的crush是二进制格式的。
vim /tmp/crush.txt
翻到最下面,有个#rule:
# rules
rule replicated_ruleset {
        ruleset 0
        type replicated
        min_size 1
        max_size 10
        step take default
        step chooseleaf firstn 0 type host
        step emit
}
复制粘贴再加个rule,并修改成下面的样子:
# rules
rule rule-sata { #改个名字,好认
        ruleset 0
        type replicated
        min_size 1
        max_size 10
        step take root-sata #改成图中的SATA的root名
        step chooseleaf firstn 0 type host
        step emit
}
rule rule-ssd { #改个名字
        ruleset 1 #增加rule的编号
        type replicated
        min_size 1
        max_size 10
        step take root-ssd #改成图中的SSD的root名
        step chooseleaf firstn 0 type host
        step emit
}
保存退出,编译刚刚的crush.txt,并注入集群中:
[root@ceph-1 cluster]# crushtool -c /tmp/crush.txt -o /tmp/crush_new.bin
[root@ceph-1 cluster]# ceph osd setcrushmap -i /tmp/crush_new.bin
set crush map