04 Ovs桥与 Vxlan隧道
vxlan本身支持隧道。
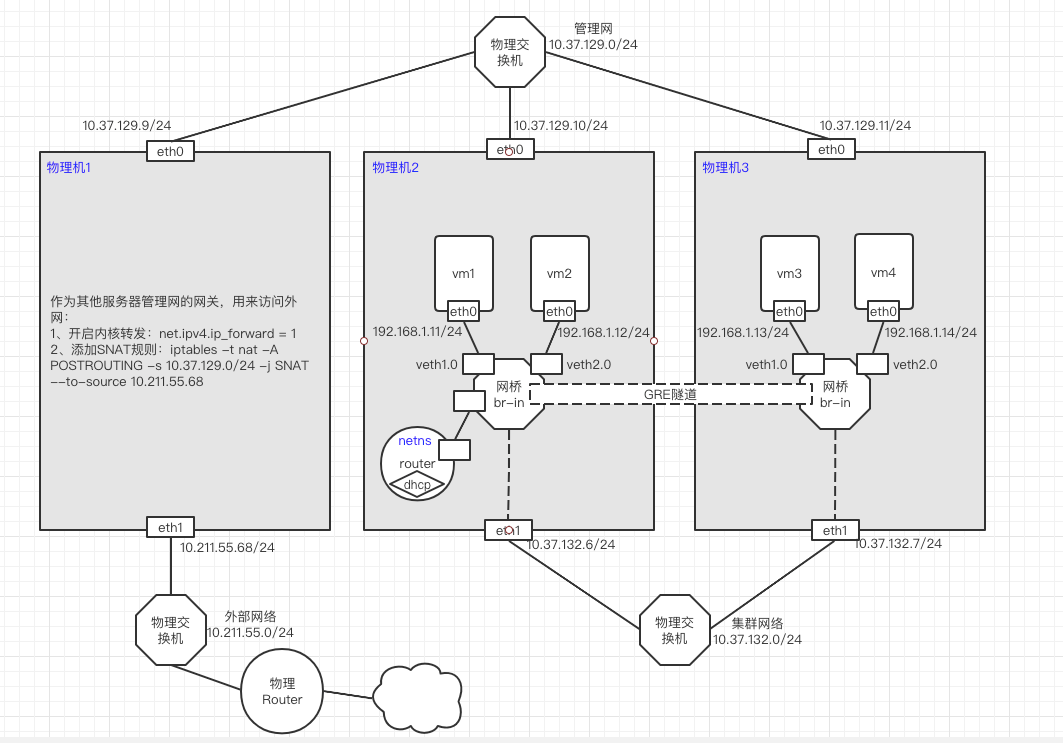
其配置方式与GRE隧道基本相同,只是指定interface时type=vxlan,其他的都相同。
# 开启内核转发
[root@centos7-1 ~]# vi /etc/sysctl.conf
# sysctl settings are defined through files in
# /usr/lib/sysctl.d/, /run/sysctl.d/, and /etc/sysctl.d/.
#
# Vendors settings live in /usr/lib/sysctl.d/.
# To override a whole file, create a new file with the same in
# /etc/sysctl.d/ and put new settings there. To override
# only specific settings, add a file with a lexically later
# name in /etc/sysctl.d/ and put new settings there.
#
# For more information, see sysctl.conf(5) and sysctl.d(5).
net.ipv4.ip_forward = 1
[root@centos7-1 ~]# sysctl -p
net.ipv4.ip_forward = 1

# 添加SNAT规则
[root@centos7-1 ~]# iptables -t nat -A POSTROUTING -s 10.37.129.0/24 -j SNAT --to-source 10.211.55.68
[root@centos7-1 ~]# iptables -vnL -t nat
Chain PREROUTING (policy ACCEPT 0 packets, 0 bytes)
 pkts bytes target     prot opt in     out     source               destination

Chain INPUT (policy ACCEPT 0 packets, 0 bytes)
 pkts bytes target     prot opt in     out     source               destination

Chain OUTPUT (policy ACCEPT 0 packets, 0 bytes)
 pkts bytes target     prot opt in     out     source               destination

Chain POSTROUTING (policy ACCEPT 0 packets, 0 bytes)
 pkts bytes target     prot opt in     out     source               destination
    0     0 SNAT       all  --  *      *       10.37.129.0/24       0.0.0.0/0            to:10.211.55.68
[root@centos7-2 ~]# ip r add default via 10.37.129.9 dev eth0

[root@centos7-3 ~]# ip r add default via 10.37.129.9 dev eth0
node2和node3安装openvswtc、qemu-kvm
cat > /etc/yum.repos.d/openstack-rocky.repo <<EOF
[openstack]
name=opentack
baseurl=https://mirrors.aliyun.com/centos/7/cloud/x86_64/openstack-rocky/
gpgcheck=0

[Virt]
name=CentOS-$releasever - Base
baseurl=https://mirrors.aliyun.com/centos/7/virt/x86_64/kvm-common/
gpgcheck=0
gpgkey=file:///etc/pki/rpm-gpg/RPM-GPG-KEY-CentOS-7
EOF

yum install -y openvswitch
systemctl start openvswitch
systemctl enable openvswitch

yum install -y qemu-kvm
ln -sv /usr/libexec/qemu-kvm  /usr/bin
# 启动虚拟机的镜像
mkdir -pv /images/cirros
#rz -be
cd /images/cirros/
cp cirros-0.4.0-x86_64-disk.img test1.qcow2
cp cirros-0.4.0-x86_64-disk.img test2.qcow2

# 准备网卡脚本
cat >/etc/qemu-ovs-ifup<<"EOF"
#!/bin/bash

bridge=br-in

if [ -n "$1" ];then
  ip link set $1 up
  sleep 1
  ovs-vsctl add-port  $bridge $1 && exit 0 || exit 1
  brctl addif $bridge $1 && exit 0 || exit 1
else
  echo "Error: no port specified"
  exit 2
fi
EOF

chmod +x /etc/qemu-ovs-ifup

cat >/etc/qemu-ovs-ifdown<<"EOF"
#!/bin/bash

bridge=br-in

if [ -n "$1" ];then
  ip link set $1 down
  sleep 1
  ovs-vsctl del-port  $bridge $1 && exit 0 || exit 1
else
  echo "Error: no port specified"
  exit 2
fi
EOF

chmod +x /etc/qemu-ovs-ifdown
ovs-vsctl add-br br-in
采用netns+veth+dnsmasq,veth设备的一端接入到netns中,另一端接入到ovs桥br-in中。
[root@centos7-2 ~]# ip netns add  router
[root@centos7-2 ~]# ip link add vethr type veth peer name vethb
[root@centos7-2 ~]# ip link set vethr netns router
[root@centos7-2 ~]# ip netns exec router ip link set vethr up
[root@centos7-2 ~]# ip netns exec router ip a add 192.168.1.254/24 dev vethr
[root@centos7-2 ~]# ovs-vsctl add-port br-in vethb
[root@centos7-2 ~]# ip link set vethb up

[root@centos7-2 ~]# yum install -y dnsmasq
[root@centos7-2 ~]# cat > /etc/dnsmasq.d/netns.conf <<EOF
#DNS服务器的地址
listen-address=192.168.1.254
#设置DHCP分配的地址范围和时间
dhcp-range=192.168.1.10,192.168.1.200,1h
#设定网关的地址:dnsmasq具体的option,可以通过dnsmasq --help dhcp查看
dhcp-option=3,192.168.1.254
#设定DNS服务器
dhcp-option=option:dns-server,114.114.114.114,8.8.4.4
EOF
#启动dnsmasq,监听67/udp端口
[root@centos7-2 ~]# ip netns exec router dnsmasq --conf-file=/etc/dnsmasq.d/netns.conf
[root@centos7-2 ~]# qemu-kvm -m 128 -smp 1 -name vm1 -drive file=/images/cirros/test1.qcow2,if=virtio,media=disk -net nic,macaddr=52:54:00:aa:bb:01 -net tap,ifname=veth1.0,script=/etc/qemu-ovs-ifup,downscript=/etc/qemu-ovs-ifdown -nographic

# 已经自动分配IP了
# ip a
1: lo: <LOOPBACK,UP,LOWER_UP> mtu 65536 qdisc noqueue qlen 1
    link/loopback 00:00:00:00:00:00 brd 00:00:00:00:00:00
    inet 127.0.0.1/8 scope host lo
       valid_lft forever preferred_lft forever
    inet6 ::1/128 scope host
       valid_lft forever preferred_lft forever
2: eth0: <BROADCAST,MULTICAST,UP,LOWER_UP> mtu 1500 qdisc pfifo_fast qlen 1000
    link/ether 52:54:00:aa:bb:01 brd ff:ff:ff:ff:ff:ff
    inet 192.168.1.109/24 brd 192.168.1.255 scope global eth0
       valid_lft forever preferred_lft forever
    inet6 fe80::5054:ff:feaa:bb01/64 scope link
       valid_lft forever preferred_lft forever

[root@centos7-2 ~]# qemu-kvm -m 128 -smp 1 -name vm2 -drive file=/images/cirros/test2.qcow2,if=virtio,media=disk -net nic,macaddr=52:54:00:aa:bb:02 -net tap,ifname=veth2.0,script=/etc/qemu-ovs-ifup,downscript=/etc/qemu-ovs-ifdown -nographic
需要在两个ovs桥上各自添加一个port,并设置这个port上的interface属性:type=vxlan options:remote_ip=对端ip
其配置方式与GRE隧道基本相同,只是指定interface属性时type=vxlan,其他的都相同。
[root@centos7-2 ~]# ovs-vsctl add-port br-in vxlan0 -- set interface vxlan0 type=vxlan options:remote_ip=10.37.132.7  #vxlan0这个接口可以事先不存在

[root@centos7-2 ~]# ovs-vsctl list interface vxlan0
_uuid               : 07149a17-e311-4d34-8955-7d2cf543f2e1
admin_state         : up
bfd                 : {}
bfd_status          : {}
cfm_fault           : []
cfm_fault_status    : []
cfm_flap_count      : []
cfm_health          : []
cfm_mpid            : []
cfm_remote_mpids    : []
cfm_remote_opstate  : []
duplex              : []
error               : []
external_ids        : {}
ifindex             : 15
ingress_policing_burst: 0
ingress_policing_rate: 0
lacp_current        : []
link_resets         : 0
link_speed          : []
link_state          : up
lldp                : {}
mac                 : []
mac_in_use          : "da:61:f3:90:5f:88"
mtu                 : []
mtu_request         : []
name                : "vxlan0"
ofport              : 7
ofport_request      : []
options             : {remote_ip="10.37.132.7"}
other_config        : {}
statistics          : {rx_bytes=0, rx_packets=0, tx_bytes=0, tx_packets=0}
status              : {tunnel_egress_iface="eth1", tunnel_egress_iface_carrier=up}
type                : vxlan
[root@centos7-3 ~]# ovs-vsctl add-port br-in vxlan0 -- set interface vxlan0 type=vxlan options:remote_ip=10.37.132.6  # -- 分隔,可以写多个子命令

[root@centos7-3 ~]# ovs-vsctl list interface vxlan0
_uuid               : 832700c3-d14b-4793-8676-1b5c343b03f9
admin_state         : up
bfd                 : {}
bfd_status          : {}
cfm_fault           : []
cfm_fault_status    : []
cfm_flap_count      : []
cfm_health          : []
cfm_mpid            : []
cfm_remote_mpids    : []
cfm_remote_opstate  : []
duplex              : []
error               : []
external_ids        : {}
ifindex             : 12
ingress_policing_burst: 0
ingress_policing_rate: 0
lacp_current        : []
link_resets         : 0
link_speed          : []
link_state          : up
lldp                : {}
mac                 : []
mac_in_use          : "06:a0:48:e9:a0:8a"
mtu                 : []
mtu_request         : []
name                : "vxlan0"
ofport              : 5
ofport_request      : []
options             : {remote_ip="10.37.132.6"}
other_config        : {}
statistics          : {rx_bytes=0, rx_packets=0, tx_bytes=0, tx_packets=0}
status              : {tunnel_egress_iface="eth1", tunnel_egress_iface_carrier=up}
type                : vxlan
# ping 192.168.1.109 -c1
PING 192.168.1.109 (192.168.1.109): 56 data bytes
64 bytes from 192.168.1.109: seq=0 ttl=64 time=3.389 ms

--- 192.168.1.109 ping statistics ---
1 packets transmitted, 1 packets received, 0% packet loss   # 通,说明VXLAN隧道生效
round-trip min/avg/max = 3.389/3.389/3.389 ms
此时,由于GRE隧道已经打通,所以node3上启动的虚拟机也是可以通过DHCP自动获取IP
[root@centos7-3 ~]# qemu-kvm -m 128 -smp 1 -name vm3 -drive file=/images/cirros/test1.qcow2,if=virtio,media=disk -net nic,macaddr=52:54:00:aa:bb:03 -net tap,ifname=veth1.0,script=/etc/qemu-ovs-ifup,downscript=/etc/qemu-ovs-ifdown -nographic

[root@centos7-3 ~]# qemu-kvm -m 128 -smp 1 -name vm4 -drive file=/images/cirros/test2.qcow2,if=virtio,media=disk -net nic,macaddr=52:54:00:aa:bb:04 -net tap,ifname=veth2.0,script=/etc/qemu-ovs-ifup,downscript=/etc/qemu-ovs-ifdown -nographic
# ping 192.168.1.111 -c1			#通
PING 192.168.1.111 (192.168.1.111): 56 data bytes
64 bytes from 192.168.1.111: seq=0 ttl=64 time=2.700 ms

--- 192.168.1.111 ping statistics ---
1 packets transmitted, 1 packets received, 0% packet loss
round-trip min/avg/max = 2.700/2.700/2.700 ms


# ping 192.168.1.112 -c1			#通
PING 192.168.1.112 (192.168.1.112): 56 data bytes
64 bytes from 192.168.1.112: seq=0 ttl=64 time=17.349 ms

--- 192.168.1.112 ping statistics ---
1 packets transmitted, 1 packets received, 0% packet loss
round-trip min/avg/max = 17.349/17.349/17.349 ms
#VM1
# ping 192.168.1.13

[root@centos7-2 ~]# tcpdump -nn -i eth1
tcpdump: verbose output suppressed, use -v or -vv for full protocol decode
listening on eth1, link-type EN10MB (Ethernet), capture size 262144 bytes
15:23:00.687131 IP 10.37.132.6 > 10.37.132.7: GREv0, length 102: IP 192.168.1.109 > 192.168.1.13: ICMP echo request, id 44033, seq 149, length 64
15:23:00.688307 IP 10.37.132.7 > 10.37.132.6: GREv0, length 102: IP 192.168.1.13 > 192.168.1.109: ICMP echo reply, id 44033, seq 149, length 64
15:23:01.689727 IP 10.37.132.6 > 10.37.132.7: GREv0, length 102: IP 192.168.1.109 > 192.168.1.13: ICMP echo request, id 44033, seq 150, length 64
15:23:01.691515 IP 10.37.132.7 > 10.37.132.6: GREv0, length 102: IP 192.168.1.13 > 192.168.1.109: ICMP echo reply, id 44033, seq 150, length 64
15:23:02.692230 IP 10.37.132.6 > 10.37.132.7: GREv0, length 102: IP 192.168.1.109 > 192.168.1.13: ICMP echo request, id 44033, seq 151, length 64
15:23:02.694352 IP 10.37.132.7 > 10.37.132.6: GREv0, length 102: IP 192.168.1.13 > 192.168.1.109: ICMP echo reply, id 44033, seq 151, length 64
# 设置VNI(VXLAN Network Identifier)为123。
ovs-vsctl add-port ovs-vxlan vxlan0 -- set interface vxlan0 type=vxlan options:remote_ip=192.168.0.102 options:key=123
或
ovs-vsctl  set interface vxlan0 options:key=123
说明:
VXLAN的VNI是没有报文隔离能力的。在OpenStack中,每个VNI表示一个租户VPC网络,是通过br-int桥将VNI转换成VLAN ID,然后通过VLAN的隔离能力实现网络的隔离。
vm1和vm3划分到VLAN10;
vm2和vm4划分到VLAN20;
[root@centos7-2 ~]# ovs-vsctl show
b3965e68-22d8-4a48-80a9-30c430a516b3
    Bridge br-in
        Port "veth2.0"
            Interface "veth2.0"
        Port vethb
            Interface vethb
        Port "veth1.0"
            Interface "veth1.0"
        Port "vxlan0"
            Interface "vxlan0"
                type: vxlan
                options: {remote_ip="10.37.132.7"}
        Port br-in
            Interface br-in
                type: internal
    ovs_version: "2.11.0"
[root@centos7-2 ~]# ovs-vsctl set port veth1.0 tag=10
[root@centos7-2 ~]# ovs-vsctl set port veth2.0 tag=20
[root@centos7-2 ~]# ovs-vsctl show
b3965e68-22d8-4a48-80a9-30c430a516b3
    Bridge br-in
        Port "veth2.0"
            tag: 20
            Interface "veth2.0"
        Port vethb
            Interface vethb
        Port "veth1.0"
            tag: 10
            Interface "veth1.0"
        Port "vxlan0"
            Interface "vxlan0"
                type: vxlan
                options: {remote_ip="10.37.132.7"}
        Port br-in
            Interface br-in
                type: internal
    ovs_version: "2.11.0"
[root@centos7-3 ~]# ovs-vsctl show
5972c459-6d72-4984-9d88-6e0d7b2a00e8
    Bridge br-in
        Port br-in
            Interface br-in
                type: internal
        Port "veth2.0"
            Interface "veth2.0"
        Port "veth1.0"
            Interface "veth1.0"
        Port "vxlan0"
            Interface "vxlan0"
                type: vxlan
                options: {remote_ip="10.37.132.6"}
    ovs_version: "2.11.0"
[root@centos7-3 ~]# ovs-vsctl set port veth1.0 tag=10
[root@centos7-3 ~]# ovs-vsctl set port veth2.0 tag=20
[root@centos7-3 ~]# ovs-vsctl show
5972c459-6d72-4984-9d88-6e0d7b2a00e8
    Bridge br-in
        Port br-in
            Interface br-in
                type: internal
        Port "veth2.0"
            tag: 20
            Interface "veth2.0"
        Port "veth1.0"
            tag: 10
            Interface "veth1.0"
        Port "vxlan0"
            Interface "vxlan0"
                type: vxlan
                options: {remote_ip="10.37.132.6"}
    ovs_version: "2.11.0"
GRE隧道,默认是trunc口。
#VM1-->VM3 通
# ping 192.168.1.111 -c1
PING 192.168.1.111 (192.168.1.111): 56 data bytes
64 bytes from 192.168.1.111: seq=0 ttl=64 time=1.990 ms

--- 192.168.1.111 ping statistics ---
1 packets transmitted, 1 packets received, 0% packet loss
round-trip min/avg/max = 1.990/1.990/1.990 ms

#VM1-->VM4  不通
# ping 192.168.1.112 -c1
PING 192.168.1.112 (192.168.1.112): 56 data bytes

--- 192.168.1.112 ping statistics ---
1 packets transmitted, 0 packets received, 100% packet loss


#VM2-->VM3 不通
# ping 192.168.1.111 -c1
PING 192.168.1.111 (192.168.1.111): 56 data bytes

--- 192.168.1.111 ping statistics ---
1 packets transmitted, 0 packets received, 100% packet loss


#VM2-->VM4  通
# ping 192.168.1.112 -c1
PING 192.168.1.112 (192.168.1.112): 56 data bytes
64 bytes from 192.168.1.112: seq=0 ttl=64 time=11.542 ms

--- 192.168.1.112 ping statistics ---
1 packets transmitted, 1 packets received, 0% packet loss
round-trip min/avg/max = 11.542/11.542/11.542 ms