05 实现 Floating IP
说明:node2和node3都处于内网环境。无法访问外网。node1是接入到公网的。如果需要访问外网,则需要使用node1上的路由设备配置SNAT规则,也可以通过为某个虚拟机分配Floating IP。
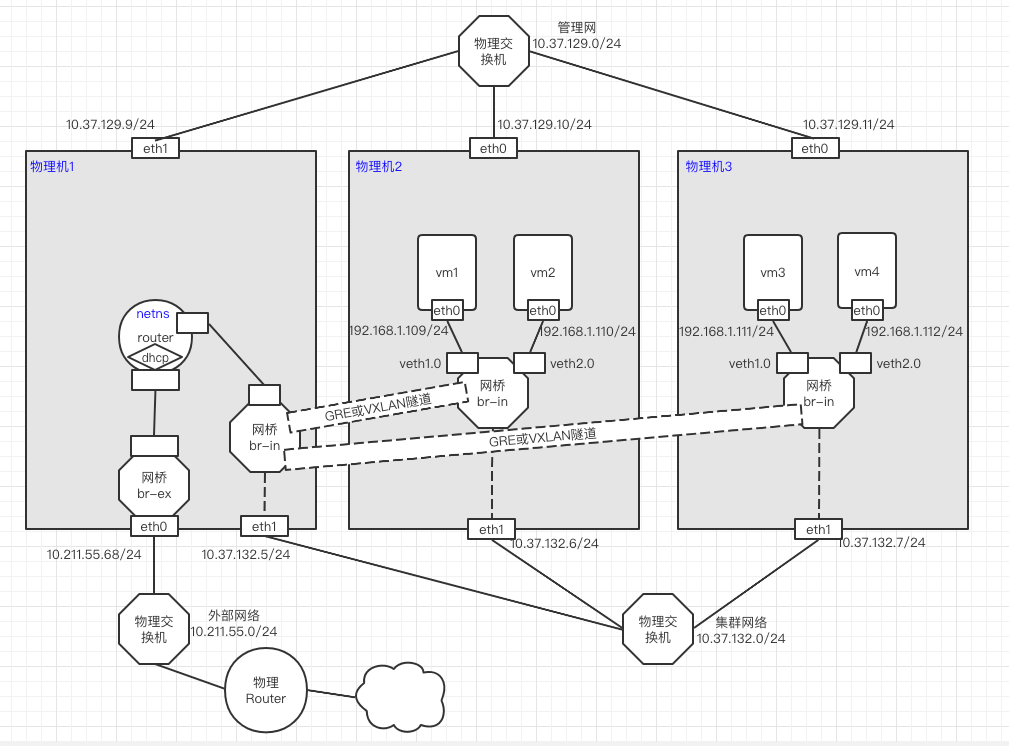
上图中,不要打通node1和node2的隧道,否则3个node会形成二层环路,造成广播风暴。
如果node2和node3不需要连接公网下载软件,则可以不进行该步骤。
# 开启内核转发
[root@centos7-1 ~]# vi /etc/sysctl.conf
# sysctl settings are defined through files in
# /usr/lib/sysctl.d/, /run/sysctl.d/, and /etc/sysctl.d/.
#
# Vendors settings live in /usr/lib/sysctl.d/.
# To override a whole file, create a new file with the same in
# /etc/sysctl.d/ and put new settings there. To override
# only specific settings, add a file with a lexically later
# name in /etc/sysctl.d/ and put new settings there.
#
# For more information, see sysctl.conf(5) and sysctl.d(5).
net.ipv4.ip_forward = 1
[root@centos7-1 ~]# sysctl -p
net.ipv4.ip_forward = 1

# 添加SNAT规则
[root@centos7-1 ~]# iptables -t nat -A POSTROUTING -s 10.37.129.0/24 -j SNAT --to-source 10.211.55.68
[root@centos7-1 ~]# iptables -vnL -t nat
Chain PREROUTING (policy ACCEPT 0 packets, 0 bytes)
 pkts bytes target     prot opt in     out     source               destination

Chain INPUT (policy ACCEPT 0 packets, 0 bytes)
 pkts bytes target     prot opt in     out     source               destination

Chain OUTPUT (policy ACCEPT 0 packets, 0 bytes)
 pkts bytes target     prot opt in     out     source               destination

Chain POSTROUTING (policy ACCEPT 0 packets, 0 bytes)
 pkts bytes target     prot opt in     out     source               destination
    0     0 SNAT       all  --  *      *       10.37.129.0/24       0.0.0.0/0            to:10.211.55.68
[root@centos7-2 ~]# ip r add default via 10.37.129.9 dev eth0

[root@centos7-3 ~]# ip r add default via 10.37.129.9 dev eth0
包括:
- ovs网桥:br-in和br-ex。(br-ex可以使用ovs桥,也可以使用linux bridge)
- 建立隧道
- netns实现router和DHCP
- openvswitch、qemu-kvm的安装
node1、node2和node3:
cat > /etc/yum.repos.d/openstack-rocky.repo <<EOF
[openstack]
name=opentack
baseurl=https://mirrors.aliyun.com/centos/7/cloud/x86_64/openstack-rocky/
gpgcheck=0

[Virt]
name=CentOS-$releasever - Base
baseurl=https://mirrors.aliyun.com/centos/7/virt/x86_64/kvm-common/
gpgcheck=0
gpgkey=file:///etc/pki/rpm-gpg/RPM-GPG-KEY-CentOS-7
EOF

yum install -y openvswitch
systemctl start openvswitch
systemctl enable openvswitch
node2和node3:
yum install -y qemu-kvm
ln -sv /usr/libexec/qemu-kvm  /usr/bin/

#准备虚拟机磁盘镜像
mkdir -pv /images/cirros
cd /images/cirros/
#rz -be
cp cirros-0.4.0-x86_64-disk.img test1.qcow2
cp cirros-0.4.0-x86_64-disk.img test2.qcow2

# 准备网卡脚本
cat >/etc/qemu-ovs-ifup<<"EOF"
#!/bin/bash

bridge=br-in

if [ -n "$1" ];then
  ip link set $1 up
  sleep 1
  ovs-vsctl add-port  $bridge $1 && exit 0 || exit 1
  brctl addif $bridge $1 && exit 0 || exit 1
else
  echo "Error: no port specified"
  exit 2
fi
EOF

chmod +x /etc/qemu-ovs-ifup

cat >/etc/qemu-ovs-ifdown<<"EOF"
#!/bin/bash

bridge=br-in

if [ -n "$1" ];then
  ip link set $1 down
  sleep 1
  ovs-vsctl del-port  $bridge $1 && exit 0 || exit 1
else
  echo "Error: no port specified"
  exit 2
fi
EOF

chmod +x /etc/qemu-ovs-ifdown
Node1、node2、node3:
ovs-vsctl add-br br-in
ip link set br-in up
node2、node3都要与node1创建点对点隧道(GRE或VXLAN)。此时演示使用VXLAN隧道。注意不要3个node两两创建隧道,这样会形成二层环路,造成广播风暴。
[root@Centos7-1 ~]# ovs-vsctl add-port br-in vxlan12 -- set interface vxlan12 type=vxlan option:remote_ip=10.37.132.6
[root@Centos7-1 ~]# ovs-vsctl add-port br-in vxlan13 -- set interface vxlan13 type=vxlan option:remote_ip=10.37.132.7

[root@Centos7-2 ~]# ovs-vsctl add-port br-in vxlan21 -- set interface vxlan21 type=vxlan option:remote_ip=10.37.132.5

[root@Centos7-3 ~]# ovs-vsctl add-port br-in vxlan31 -- set interface vxlan31 type=vxlan option:remote_ip=10.37.132.5
br-ex桥可以使用ovs桥,也可以使用linux Bridge。此处演示使用ovs桥。
为什么要使用桥br-ex?
因为物理网卡eth0如果直接接入到netns中,只能加入到一个netns中。而实际情况下,会有多个netns与eth0二层互联。所以需要一个网关设备来转接。
Node1:
[root@Centos7-1 ~]# ovs-vsctl add-br br-ex
[root@Centos7-1 ~]# ip link set br-ex up
[root@Centos7-1 ~]# ip a del 10.211.55.68/24 dev eth0;ovs-vsctl add-port br-ex eth0; ip a add 10.211.55.68/24 dev br-ex; ip route add default via 10.211.55.1 dev br-ex
实现功能:
- 路由器功能
- DHCP功能
- Floating IP(该步骤不实现此功能,后面单独一个章节实现)
采用netns+veth+dnsmasq,veth设备的一端接入到netns中,另一端接入到ovs桥中。
#router所在宿主机开启内核转发
[root@centos7-1 ~]# vi /etc/sysctl.conf
[root@centos7-1 ~]# cat /etc/sysctl.conf
# sysctl settings are defined through files in
# /usr/lib/sysctl.d/, /run/sysctl.d/, and /etc/sysctl.d/.
#
# Vendors settings live in /usr/lib/sysctl.d/.
# To override a whole file, create a new file with the same in
# /etc/sysctl.d/ and put new settings there. To override
# only specific settings, add a file with a lexically later
# name in /etc/sysctl.d/ and put new settings there.
#
# For more information, see sysctl.conf(5) and sysctl.d(5).
net.ipv4.ip_forward = 1
# 使参数生效
[root@centos7-1 ~]# sysctl -p
net.ipv4.ip_forward = 1

[root@centos7-1 ~]# ip netns add  router
# 连接br-in与router:
[root@centos7-1 ~]# ip link add vethr-in type veth peer name vethin-r
[root@centos7-1 ~]# ip link set vethr-in netns router
[root@centos7-1 ~]# ip netns exec router ip link set vethr-in up
[root@centos7-1 ~]# ip netns exec router ip a add 192.168.1.254/24 dev vethr-in
[root@centos7-1 ~]# ovs-vsctl add-port br-in vethin-r
[root@centos7-1 ~]# ip link set vethin-r up

# 连接br-ex与router:
[root@centos7-1 ~]# ip link add vethr-ex type veth peer name vethex-r
[root@centos7-1 ~]# ip link set vethr-ex netns router
[root@centos7-1 ~]# ip netns exec router ip link set vethr-ex up
[root@centos7-1 ~]# ip netns exec router ip a add 10.211.55.250/24 dev vethr-ex
[root@centos7-1 ~]# ovs-vsctl add-port br-ex vethex-r
[root@centos7-1 ~]# ip link set vethex-r up
安装DHCP服务
[root@centos7-1 ~]# yum install -y dnsmasq
[root@centos7-1 ~]# cat > /etc/dnsmasq.d/netns.conf <<EOF
#DNS服务器的地址
listen-address=192.168.1.254
#设置DHCP分配的地址范围和时间
dhcp-range=192.168.1.10,192.168.1.200,1h
#设定网关的地址:dnsmasq具体的option,可以通过dnsmasq --help dhcp查看
dhcp-option=3,192.168.1.254
#设定DNS服务器
dhcp-option=option:dns-server,114.114.114.114,8.8.4.4
EOF
#启动dnsmasq,监听67/udp端口
[root@centos7-2 ~]# ip netns exec router dnsmasq --conf-file=/etc/dnsmasq.d/netns.conf
配置路由器
#添加默认的路由规则
[root@Centos7-1 ~]# ip netns exec router ip r add default via 10.211.55.1 dev vethr-ex
#添加SNAT规则
[root@Centos7-1 ~]# ip netns exec router iptables -t nat -A POSTROUTING -s 192.168.1.0/24 ! -d 192.168.1.0/24 -j SNAT --to-source 10.211.55.250
[root@centos7-2 ~]# qemu-kvm -m 128 -smp 1 -name vm1 -drive file=/images/cirros/test1.qcow2,if=virtio,media=disk -net nic,macaddr=52:54:00:aa:bb:01 -net tap,ifname=veth1.0,script=/etc/qemu-ovs-ifup,downscript=/etc/qemu-ovs-ifdown -nographic

# 已经自动分配IP了
# ip a
1: lo: <LOOPBACK,UP,LOWER_UP> mtu 65536 qdisc noqueue qlen 1
    link/loopback 00:00:00:00:00:00 brd 00:00:00:00:00:00
    inet 127.0.0.1/8 scope host lo
       valid_lft forever preferred_lft forever
    inet6 ::1/128 scope host
       valid_lft forever preferred_lft forever
2: eth0: <BROADCAST,MULTICAST,UP,LOWER_UP> mtu 1500 qdisc pfifo_fast qlen 1000
    link/ether 52:54:00:aa:bb:01 brd ff:ff:ff:ff:ff:ff
    inet 192.168.1.109/24 brd 192.168.1.255 scope global eth0
       valid_lft forever preferred_lft forever
    inet6 fe80::5054:ff:feaa:bb01/64 scope link
       valid_lft forever preferred_lft forever

[root@centos7-2 ~]# qemu-kvm -m 128 -smp 1 -name vm2 -drive file=/images/cirros/test2.qcow2,if=virtio,media=disk -net nic,macaddr=52:54:00:aa:bb:02 -net tap,ifname=veth2.0,script=/etc/qemu-ovs-ifup,downscript=/etc/qemu-ovs-ifdown -nographic
[root@centos7-3 ~]# qemu-kvm -m 128 -smp 1 -name vm3 -drive file=/images/cirros/test1.qcow2,if=virtio,media=disk -net nic,macaddr=52:54:00:aa:bb:03 -net tap,ifname=veth1.0,script=/etc/qemu-ovs-ifup,downscript=/etc/qemu-ovs-ifdown -nographic

[root@centos7-3 ~]# qemu-kvm -m 128 -smp 1 -name vm4 -drive file=/images/cirros/test2.qcow2,if=virtio,media=disk -net nic,macaddr=52:54:00:aa:bb:04 -net tap,ifname=veth2.0,script=/etc/qemu-ovs-ifup,downscript=/etc/qemu-ovs-ifdown -nographic
vm1上测试:ping vm2、vm3、vm4
# ping 192.168.1.110 -c1			#通
PING 192.168.1.110 (192.168.1.110): 56 data bytes
64 bytes from 192.168.1.110: seq=0 ttl=64 time=1.534 ms

--- 192.168.1.110 ping statistics ---
1 packets transmitted, 1 packets received, 0% packet loss
round-trip min/avg/max = 1.534/1.534/1.534 ms

# ping 192.168.1.111 -c1			#通
PING 192.168.1.111 (192.168.1.111): 56 data bytes
64 bytes from 192.168.1.111: seq=0 ttl=64 time=2.810 ms

--- 192.168.1.111 ping statistics ---
1 packets transmitted, 1 packets received, 0% packet loss
round-trip min/avg/max = 2.810/2.810/2.810 ms


# ping 192.168.1.112 -c1			#通
PING 192.168.1.112 (192.168.1.112): 56 data bytes
64 bytes from 192.168.1.112: seq=0 ttl=64 time=3.021 ms

--- 192.168.1.112 ping statistics ---
1 packets transmitted, 1 packets received, 0% packet loss
round-trip min/avg/max = 3.021/3.021/3.021 ms
vm1和vm3划分到VLAN10;
vm2和vm4划分到VLAN20;
[root@Centos7-2 ~]# ovs-vsctl show
e8f8f272-f351-4739-941f-d0141094e349
    Bridge br-in
        Port "vxlan21"
            Interface "vxlan21"
                type: vxlan
                options: {remote_ip="10.37.132.5"}
        Port br-in
            Interface br-in
                type: internal
        Port "veth1.0"
            Interface "veth1.0"
        Port "veth2.0"
            Interface "veth2.0"
    ovs_version: "2.11.0"
[root@centos7-2 ~]# ovs-vsctl set port veth1.0 tag=10
[root@centos7-2 ~]# ovs-vsctl set port veth2.0 tag=20
[root@centos7-2 ~]# ovs-vsctl show
e8f8f272-f351-4739-941f-d0141094e349
    Bridge br-in
        Port "vxlan21"
            Interface "vxlan21"
                type: vxlan
                options: {remote_ip="10.37.132.5"}
        Port br-in
            Interface br-in
                type: internal
        Port "veth1.0"
            tag: 10
            Interface "veth1.0"
        Port "veth2.0"
            tag: 20
            Interface "veth2.0"
    ovs_version: "2.11.0"
[root@centos7-3 ~]# ovs-vsctl show
3691fdb9-4d96-42f0-a0ff-b74b2070814a
    Bridge br-in
        Port br-in
            Interface br-in
                type: internal
        Port "vxlan31"
            Interface "vxlan31"
                type: vxlan
                options: {remote_ip="10.37.132.5"}
        Port "veth2.0"
            Interface "veth2.0"
        Port "veth1.0"
            Interface "veth1.0"
    ovs_version: "2.11.0"
[root@centos7-3 ~]# ovs-vsctl set port veth1.0 tag=10
[root@centos7-3 ~]# ovs-vsctl set port veth2.0 tag=20
[root@centos7-3 ~]# ovs-vsctl show
3691fdb9-4d96-42f0-a0ff-b74b2070814a
    Bridge br-in
        Port br-in
            Interface br-in
                type: internal
        Port "vxlan31"
            Interface "vxlan31"
                type: vxlan
                options: {remote_ip="10.37.132.5"}
        Port "veth2.0"
            tag: 20
            Interface "veth2.0"
        Port "veth1.0"
            tag: 10
            Interface "veth1.0"
    ovs_version: "2.11.0"
GRE隧道,默认是trunc口。
测试:
#VM1-->VM3 通
# ping 192.168.1.111 -c1
PING 192.168.1.111 (192.168.1.111): 56 data bytes
64 bytes from 192.168.1.111: seq=0 ttl=64 time=11.354 ms

--- 192.168.1.111 ping statistics ---
1 packets transmitted, 1 packets received, 0% packet loss
round-trip min/avg/max = 11.354/11.354/11.354 ms

#VM1-->VM4  不通
# ping 192.168.1.112 -c1
PING 192.168.1.112 (192.168.1.112): 56 data bytes

--- 192.168.1.112 ping statistics ---
1 packets transmitted, 0 packets received, 100% packet loss


#VM2-->VM3 不通
# ping 192.168.1.111 -c1
PING 192.168.1.111 (192.168.1.111): 56 data bytes

--- 192.168.1.111 ping statistics ---
1 packets transmitted, 0 packets received, 100% packet loss


#VM2-->VM4  通
# ping 192.168.1.112 -c1
PING 192.168.1.112 (192.168.1.112): 56 data bytes
64 bytes from 192.168.1.112: seq=0 ttl=64 time=9.857 ms

--- 192.168.1.112 ping statistics ---
1 packets transmitted, 1 packets received, 0% packet loss
round-trip min/avg/max = 9.857/9.857/9.857 ms
Floating IP是配置在虚拟路由器上的一个IP,然后通过DNAT和SNAT将其绑定在某个虚拟机上。
示例:创建一个Floating IP为10.211.55.100,将其绑定在vm1(192.168.1.109)上。这样,vm1可以通过FIP访问外网,也可以通过FIP被外网访问。
# 在路由器中配置IP
[root@Centos7-1 ~]# ip netns exec router ip a
1: lo: <LOOPBACK> mtu 65536 qdisc noop state DOWN group default qlen 1000
    link/loopback 00:00:00:00:00:00 brd 00:00:00:00:00:00
10: vethr-in@if9: <BROADCAST,MULTICAST,UP,LOWER_UP> mtu 1500 qdisc noqueue state UP group default qlen 1000
    link/ether ce:05:9f:3a:0f:dc brd ff:ff:ff:ff:ff:ff link-netnsid 0
    inet 192.168.1.254/24 scope global vethr-in
       valid_lft forever preferred_lft forever
    inet6 fe80::cc05:9fff:fe3a:fdc/64 scope link
       valid_lft forever preferred_lft forever
12: vethr-ex@if11: <BROADCAST,MULTICAST,UP,LOWER_UP> mtu 1500 qdisc noqueue state UP group default qlen 1000
    link/ether aa:24:c9:6d:f1:d8 brd ff:ff:ff:ff:ff:ff link-netnsid 0
    inet 10.211.55.250/24 scope global vethr-ex
       valid_lft forever preferred_lft forever
    inet6 fdb2:2c26:f4e4:0:a824:c9ff:fe6d:f1d8/64 scope global mngtmpaddr dynamic
       valid_lft 2591795sec preferred_lft 604595sec
    inet6 fe80::a824:c9ff:fe6d:f1d8/64 scope link
       valid_lft forever preferred_lft forever
[root@Centos7-1 ~]# ip netns exec router ip a add 10.211.55.100/24 dev vethr-ex:0
[root@Centos7-1 ~]# ip netns exec router ip a
1: lo: <LOOPBACK> mtu 65536 qdisc noop state DOWN group default qlen 1000
    link/loopback 00:00:00:00:00:00 brd 00:00:00:00:00:00
10: vethr-in@if9: <BROADCAST,MULTICAST,UP,LOWER_UP> mtu 1500 qdisc noqueue state UP group default qlen 1000
    link/ether ce:05:9f:3a:0f:dc brd ff:ff:ff:ff:ff:ff link-netnsid 0
    inet 192.168.1.254/24 scope global vethr-in
       valid_lft forever preferred_lft forever
    inet6 fe80::cc05:9fff:fe3a:fdc/64 scope link
       valid_lft forever preferred_lft forever
12: vethr-ex@if11: <BROADCAST,MULTICAST,UP,LOWER_UP> mtu 1500 qdisc noqueue state UP group default qlen 1000
    link/ether aa:24:c9:6d:f1:d8 brd ff:ff:ff:ff:ff:ff link-netnsid 0
    inet 10.211.55.250/24 scope global vethr-ex
       valid_lft forever preferred_lft forever
    inet 10.211.55.100/24 scope global secondary vethr-ex  #Floating IP
       valid_lft forever preferred_lft forever
    inet6 fdb2:2c26:f4e4:0:a824:c9ff:fe6d:f1d8/64 scope global mngtmpaddr dynamic
       valid_lft 2591772sec preferred_lft 604572sec
    inet6 fe80::a824:c9ff:fe6d:f1d8/64 scope link
       valid_lft forever preferred_lft forever


# 绑定vm
[root@Centos7-1 ~]# ip netns exec router iptables -t nat -I POSTROUTING -s 192.168.1.109/32 ! -d 192.168.1.0/24 -j SNAT --to-source 10.211.55.100
[root@Centos7-1 ~]# ip netns exec router iptables -t nat -I PREROUTING -d 10.211.55.100/32 -j DNAT --to-destination 192.168.1.109
[root@Centos7-1 ~]# ip netns exec router iptables -t nat -vnL
Chain PREROUTING (policy ACCEPT 0 packets, 0 bytes)
 pkts bytes target     prot opt in     out     source               destination
    0     0 DNAT       all  --  *      *       0.0.0.0/0            192.168.1.109        to:10.211.55.100

Chain INPUT (policy ACCEPT 0 packets, 0 bytes)
 pkts bytes target     prot opt in     out     source               destination

Chain OUTPUT (policy ACCEPT 0 packets, 0 bytes)
 pkts bytes target     prot opt in     out     source               destination

Chain POSTROUTING (policy ACCEPT 0 packets, 0 bytes)
 pkts bytes target     prot opt in     out     source               destination
    0     0 SNAT       all  --  *      *       192.168.1.109        0.0.0.0/0            to:10.211.55.100
  128  7704 SNAT       all  --  *      *       192.168.1.0/24      !192.168.1.0/24       to:10.211.55.250
因为vm1是属于VLAN=10的,如果启用VLAN,则需要设定node1上的br-in网桥的接口的VLAN:
[root@Centos7-1 ~]# ovs-vsctl set port vethin-r tag=10
[root@Centos7-1 ~]# ovs-vsctl show
eeb7b0b9-808d-4f96-a894-d76e6e1cac42
    Bridge br-in
        Port "vxlan13"
            Interface "vxlan13"
                type: vxlan
                options: {remote_ip="10.37.132.7"}
        Port br-in
            Interface br-in
                type: internal
        Port vethin-r
            tag: 10
            Interface vethin-r
        Port "vxlan12"
            Interface "vxlan12"
                type: vxlan
                options: {remote_ip="10.37.132.6"}
    Bridge br-ex
        Port br-ex
            Interface br-ex
                type: internal
        Port "eth0"
            Interface "eth0"
        Port vethex-r
            Interface vethex-r
    ovs_version: "2.11.0"
测试:
# 外部访问Floating IP
[ Mac-mini:/Users/lijuzhang ]  ➜ ping 10.211.55.100 -c1
PING 10.211.55.100 (10.211.55.100): 56 data bytes
64 bytes from 10.211.55.100: icmp_seq=0 ttl=63 time=2.220 ms

--- 10.211.55.100 ping statistics ---
1 packets transmitted, 1 packets received, 0.0% packet loss
round-trip min/avg/max/stddev = 2.220/2.220/2.220/0.000 ms

#vm1访问外网
# ping 114.114.114.114 -c1
PING 114.114.114.114 (114.114.114.114): 56 data bytes
64 bytes from 114.114.114.114: seq=0 ttl=127 time=3.215 ms

--- 114.114.114.114 ping statistics ---
1 packets transmitted, 1 packets received, 0% packet loss
round-trip min/avg/max = 3.215/3.215/3.215 ms