Chrony设置服务器集群同步时间
Chrony是一个开源的自由软件,像CentOS 7或基于RHEL 7操作系统,已经是默认服务,默认配置文件在 /etc/chrony.conf 它能保持系统时间与时间服务器(NTP)同步,让时间始终保持同步。相对于NTP时间同步软件,占据很大优势。其用法也很简单。当然,centos6也是可以使用chrony。
Chrony是网格创间协议的(NTP)的另一种实现.与网格时间协议后台程序(ntpd)不同.它可以更快地 且史准确地同步系统时钟。请注意:ntpd仍然包含只中以供需要运行NTP服务的齐户便用.
Chrony的优势包括:
- 更快的同步,只需要数分钟(甚至是毫秒、微妙级别)而非数小时时间。从而最大程度减少了时间和频率误差.这对于并非全天24小时运行的台式计算机或系统而言非常有用。
- 能够更好地响应时钟频率的快速变化。这对于具备不稳定时钟的虚拟机或导致时钟频率发生变化的 节能技术而言非常有用。
- 在初始同步后,它不会停止时钟,以防对需要系统时间保持单调的应用程序造成影响。
- 在应对临时非对称址延时,(例如,在大规模下载造成连接饱和时)提供了更好的稳定性。
- 无需对服务器进行定期轮询,因此具备问歇性网络连接的系统仍然可以快速同步时钟。
Chrony有两个核心组件,分别是:
- chronyd:是守护进程,主要用于调整内核中运行的系统时间和时间服务器同步。它确定计算机增减时间的比率,并对此进行调整补偿。chronyd既可以作为服务器端,也可作为客户端。
- chronyc:提供一个用户界面,用于监控性能并进行多样化的配置。它可以在chronyd实例控制的计算机上工作,也可以在一台不同的远程计算机上工作。主要用来测试。
实验OS环境:
10.28.204.65 客户端
10.28.204.66 服务端
CentOS Linux release 7.4.1708 (Core)
情况说明:两台机器都是内网,将204.66作为NTP时间服务器,204.65到此机器上同步时间。
1.安装Chrony
系统默认已经安装,如未安装,请执行以下命令安装:
$ yum install chrony -y
2.启动并加入开机自启动
$ systemctl enable chronyd.service
$ systemctl restart chronyd.service
$ systemctl status chronyd.service
3.Firewalld设置
$ firewall-cmd --add-service=ntp --permanent
$ firewall-cmd --reload
因NTP服务端使用123/UDP端口协议,所以允许NTP服务即可。
作为客户端,使用323/UDP端口协议。
4.配置Chrony
以下是系统默认配置文件,我对此加以说明:
$ cat /etc/chrony.conf

# 该参数可以多次用于添加时钟服务器,必须以"server "格式使用。使用pool.ntp.org项目中的公共服务器。理论上你想添加多少时间服务器都可以。(如果chrony只作为client,只需要修改这一个配置即可)
# Please consider joining the pool (http://www.pool.ntp.org/join.html).
server 0.centos.pool.ntp.org iburst
server 1.centos.pool.ntp.org iburst
server 2.centos.pool.ntp.org iburst
server 3.centos.pool.ntp.org iburst

# chronyd程序根据实际时间计算出服务器增减时间的比率,然后记录到一个文件中,在系统重启后为系统做出最佳时间补偿调整。
driftfile /var/lib/chrony/drift

#默认情况下,chronyd通过减慢速度或加快速度来逐渐调整时钟。如果时钟距离实际时间太远,则需要很长时间才能纠正错误。maketep指令可用于允许chronyd步进更新时钟。
#“makestep 1.0 3”表示:如果时间偏移量大于1s,则在chronyd启动后的前三次更新时使用步进更新的方式。通常,建议仅在前几次更新中允许步进更新,之后的更新采用逐渐调整的方式。但是有某些情况下,需要每次更新都是用步进更新,例如没有RTC的计算机、在不正确的时间进行暂停和恢复的虚拟机等情况。此时我们可以使用“makestep 1 -1”,-1表示每一次更新都使用步进更新方式。
# Allow the system clock to be stepped in the first three updates
# if its offset is larger than 1 second.
makestep 1.0 3


# 将启用一个内核模式,在该模式中,系统时间每11分钟会拷贝到实时时钟(RTC)。
rtcsync

# Enable hardware timestamping on all interfaces that support it.
# 通过使用hwtimestamp指令在某个接口上启用硬件时间戳
#hwtimestamp eth0
#hwtimestamp eth1
#hwtimestamp *

# 增加调整系统时钟所需的最小可选源数量。
# Increase the minimum number of selectable sources required to adjust
# the system clock.
#minsources 2

# 指定一台主机、子网、或者网络,以允许或拒绝NTP连接到扮演时钟服务器的机器
#allow 192.168.0.0/16
#deny 192.168/16

# Serve time even if not synchronized to a time source.
# 即使自己本身不能与远程ntp源进行时间同步,也允许将本地时间作为标准时间对外提供时间同步服务(授时服务,serve time)
# 大的值10表示时钟距离参考时钟有很多跳,其时间可能不可靠。
local stratum 10

# 指定包含NTP验证密钥的文件。
#keyfile /etc/chrony.keys

# 指定日志文件的目录。
logdir /var/log/chrony

# Select which information is logged.
#log measurements statistics tracking
其他参数:
stratumweight - stratumweight指令设置当chronyd从可用源中选择同步源时,每个层应该添加多少距离到同步距离。默认情况下,CentOS中设置为0,让chronyd在选择源时忽略源的层级。

allow / deny - 这里你可以指定一台主机、子网,或者网络以允许或拒绝NTP连接到扮演时钟服务器的机器。
allow 192.168.4.5
deny 192.168/16
cmdallow / cmddeny - 跟上面相类似,只是你可以指定哪个IP地址或哪台主机可以通过chronyd使用控制命令
5.设置时区
查看当前系统时区:
$ timedatectl
      Local time: Fri 2018-2-29 13:31:04 CST
  Universal time: Fri 2018-2-29 05:31:04 UTC
        RTC time: Fri 2018-2-29 08:17:20
       Time zone: Asia/Shanghai (CST, +0800)
     NTP enabled: yes
NTP synchronized: yes
 RTC in local TZ: no
      DST active: n/a

如果你当前的时区不正确,请按照以下操作设置。

查看所有可用的时区:
$ timedatectl list-timezones

筛选式查看在亚洲S开的上海可用时区:

$ timedatectl list-timezones |  grep  -E "Asia/S.*"

Asia/Sakhalin
Asia/Samarkand
Asia/Seoul
Asia/Shanghai
Asia/Singapore
Asia/Srednekolymsk

设置当前系统为Asia/Shanghai上海时区:

$ timedatectl set-timezone Asia/Shanghai

设置完时区后,强制同步下系统时钟:

$ chronyc -a makestep
200 OK
在生产环境中,其网络都是内网结构,那么内网如何保证服务器之间的时间同步呢?其实这个问题很简单,只需要搭建一台内网时间服务器,然后让所有计算机都到服务端(10.28.204.66)去同步时间即可。
具体操作:
在服务端(10.28.204.66)注释以下内容:
#server 0.centos.pool.ntp.org iburst
#server 1.centos.pool.ntp.org iburst
#server 2.centos.pool.ntp.org iburst
#server 3.centos.pool.ntp.org iburst

并添加以下内容:(表示与本机同步时间)
server 10.28.204.66 iburst

这样我们需求的一台内网时间服务器已经配置完毕(当然,我们也可以让其与网络时间进行同步)。

在客户端注释掉其他server,并在客户端(10.28.204.65)添加以下:
#server 0.centos.pool.ntp.org iburst
#server 1.centos.pool.ntp.org iburst
#server 2.centos.pool.ntp.org iburst
#server 3.centos.pool.ntp.org iburst
server 10.28.204.66 iburst
到此已经完成系统时间的同步。如有多台机器,操作也是如此。
查看时间同步源:
root@master01:/# chronyc sources -v
210 Number of sources = 1
.-- Source mode '^' = server, '=' = peer, '#' = local clock.
/ .- Source state '*' = current synced, '+' = combined , '-' = not combined,
| / '?' = unreachable, 'x' = time may be in error, '~' = time too variable.
|| .- xxxx [ yyyy ] +/- zzzz
|| Reachability register (octal) -. | xxxx = adjusted offset,
|| Log2(Polling interval) --. | | yyyy = measured offset,
|| \ | | zzzz = estimated error.
|| | | \
MS Name/IP address Stratum Poll Reach LastRx Last sample
===============================================================================
^? docker.inspur.com 0 6 377 - +0ns[ +0ns] +/- 0ns
查看时间同步源状态:
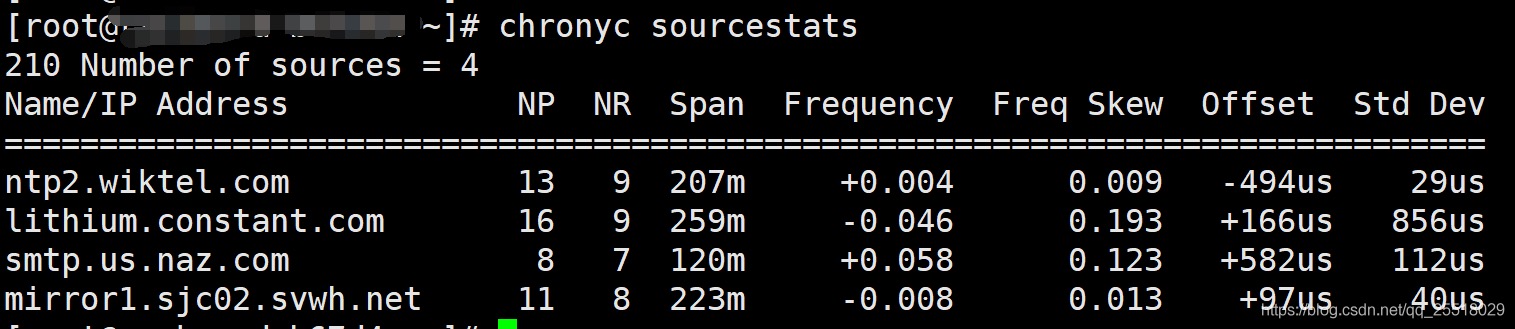
root@master01:/# chronyc sourcestats -v
210 Number of sources = 1
.- Number of sample points in measurement set.
/ .- Number of residual runs with same sign.
| / .- Length of measurement set (time).
| | / .- Est. clock freq error (ppm).
| | | / .- Est. error in freq.
| | | | / .- Est. offset.
| | | | | | On the -.
| | | | | | samples. \
| | | | | | |
Name/IP Address NP NR Span Frequency Freq Skew Offset Std Dev
==============================================================================
docker.inspur.com 0 0 0 +0.000 2000.000 +0ns 4000ms
设置硬件时间
硬件时间默认为UTC:
$ timedatectl set-local-rtc 1
启用NTP时间同步:
$ timedatectl set-ntp yes
#显示系统时间信息:
$ chronyc tracking
accheck - 检查NTP访问是否对特定主机可用
activity - 该命令会显示有多少NTP源在线/离线
add server - 手动添加一台新的NTP服务器。
clients - 在客户端报告已访问到服务器
delete - 手动移除NTP服务器或对等服务器
settime - 手动设置守护进程时间
tracking - 显示系统时间信息

| 列名 | 含义 | 具体说明 |
|---|---|---|
| M | 表示授时时钟源 | ^表示服务器,= 表示二级时钟源 ,#表示本地连接的参考时钟 |
| S | 指示源的状态 | *当前同步的源,+表示其他可接受的源,?表示连接丢失的源,x表示一个认为是falseticker 的时钟(即它的时间与大多数其他来源不一致),~表示其时间似乎具有太多可变性的来源 |
| Name/IP address | 表示源的名称或IP地址,或者参考时钟的refid值 | 无 |
| Stratum | 表示源的层级 | 层级1表示本地连接的参考时钟,第2层表示通过第1层级计算机的时钟实现同步,依此类推。 |
| Poll | 表示源轮询的频率 | 以秒为单位,值是基数2的对数,例如值6表示每64秒进行一次测量(请求server),chronyd会根据当时的情况自动改变轮询频率 |
| Reach | 表示源的可达性的锁存值(八进制数值) | 该锁存值有8位,并在当接收或丢失一次时进行一次更新,值377表示最后八次传输都收到了有效的回复 |
| LastRx | 表示从源收到最近的一次的时间 | 通常是几秒钟,字母m,h,d或y分别表示分钟,小时,天或年,值10年表示从未从该来源收到时间同步信息 |
| Last sample | 表示本地时钟与上次测量时源的偏移量 | 方括号中的数字表示实际测量的偏移值,这可以以ns(表示纳秒),us(表示微秒),ms(表示毫秒)或s(表示秒)为后缀;方括号左侧的数字表示原始测量值,这个值是经过调整以允许应用于本地时钟的任何偏差;方括号右侧表示偏差值,+/-指示器后面的数字表示测量中的误差范围,+偏移表示本地时钟快速来源 |
| 列名 | 含义 |
|---|---|
| Name/IP address | 表示源的名称或IP地址,或者参考时钟的refid值 |
| NP | 这是当前为服务器保留的采样点数,通过这些点执行线性回归方法来估算出偏移值 |
| NR | 这是在最后一次回归之后具有相同符号的偏差值的运行次数。如果此数字相对于样本数量开始变得太小,则表明直线不再适合数据。如果运行次数太少,则chronyd丢弃旧样本并重新运行回归,直到运行次数变得可接受为止 |
| Span | 这是最旧和最新样本之间的间隔。如果未显示任何单位,则该值以秒为单位。在该示例中,间隔为46分钟 |
| Frequency | 这是服务器的估算偏差值的频率,单位为百万分之一。在这种情况下,计算机的时钟估计相对于服务器以10 ** 9的速度运行1个部分 |
| Freq Skew | 这是Freq的估计误差范围(再次以百万分率计) |
| Offset | 这是源的估计偏移量 |
| Std Dev | 这是估计的样本标准偏差 |
最后需要注意的是,配置完/etc/chrony.conf后,需重启chrony服务,否则可能会不生效。
[root@k8s-master01 ~]# chronyc help
System clock:
tracking                    Display system time information
makestep                    Correct clock by stepping immediately
makestep <threshold> <updates>
                            Configure automatic clock stepping
maxupdateskew <skew>        Modify maximum valid skew to update frequency
waitsync [<max-tries> [<max-correction> [<max-skew> [<interval>]]]]
                            Wait until synchronised in specified limits

Time sources:
sources [-v]                Display information about current sources
sourcestats [-v]            Display statistics about collected measurements
reselect                    Force reselecting synchronisation source
reselectdist <dist>         Modify reselection distance

NTP sources:
activity                    Check how many NTP sources are online/offline
ntpdata [<address>]         Display information about last valid measurement
add server <address> [options]
                            Add new NTP server
add peer <address> [options]
                            Add new NTP peer
delete <address>            Remove server or peer
burst <n-good>/<n-max> [<mask>/<address>]
                            Start rapid set of measurements
maxdelay <address> <delay>  Modify maximum valid sample delay
maxdelayratio <address> <ratio>
                            Modify maximum valid delay/minimum ratio
maxdelaydevratio <address> <ratio>
                            Modify maximum valid delay/deviation ratio
minpoll <address> <poll>    Modify minimum polling interval
maxpoll <address> <poll>    Modify maximum polling interval
minstratum <address> <stratum>
                            Modify minimum stratum
offline [<mask>/<address>]  Set sources in subnet to offline status
online [<mask>/<address>]   Set sources in subnet to online status
polltarget <address> <target>
                            Modify poll target
refresh                     Refresh IP addresses

Manual time input:
manual off|on|reset         Disable/enable/reset settime command
manual list                 Show previous settime entries
manual delete <index>       Delete previous settime entry
settime <time>              Set daemon time
                            (e.g. Sep 25, 2015 16:30:05 or 16:30:05)

NTP access:
accheck <address>           Check whether address is allowed
clients                     Report on clients that have accessed the server
serverstats                 Display statistics of the server
allow [<subnet>]            Allow access to subnet as a default
allow all [<subnet>]        Allow access to subnet and all children
deny [<subnet>]             Deny access to subnet as a default
deny all [<subnet>]         Deny access to subnet and all children
local [options]             Serve time even when not synchronised
local off                   Don't serve time when not synchronised
smoothtime reset|activate   Reset/activate time smoothing
smoothing                   Display current time smoothing state

Monitoring access:
cmdaccheck <address>        Check whether address is allowed
cmdallow [<subnet>]         Allow access to subnet as a default
cmdallow all [<subnet>]     Allow access to subnet and all children
cmddeny [<subnet>]          Deny access to subnet as a default
cmddeny all [<subnet>]      Deny access to subnet and all children

Real-time clock:
rtcdata                     Print current RTC performance parameters
trimrtc                     Correct RTC relative to system clock
writertc                    Save RTC performance parameters to file

Other daemon commands:
cyclelogs                   Close and re-open log files
dump                        Dump all measurements to save files
rekey                       Re-read keys from key file

Client commands:
dns -n|+n                   Disable/enable resolving IP addresses to hostnames
dns -4|-6|-46               Resolve hostnames only to IPv4/IPv6/both addresses
timeout <milliseconds>      Set initial response timeout
retries <retries>           Set maximum number of retries
keygen [<id> [<type> [<bits>]]]
                            Generate key for key file
exit|quit                   Leave the program
help                        Generate this help
- cn.ntp.org.cn (池)来源:http://www.ntp.org.cn/pool.php
- 0.cn.pool.ntp.org
- 1.cn.pool.ntp.org
- 2.cn.pool.ntp.org
- 3.cn.pool.ntp.org
- ntp1.aliyun.com
- ntp2.aliyun.com
- ntp3.aliyun.com
- ntp4.aliyun.com
- ntp5.aliyun.com
- ntp6.aliyun.com
- ntp7.aliyun.com
yum install -y chrony

sed -i '2a server ntp1.aliyun.com iburst' /etc/chrony.conf
systemctl restart chronyd
systemctl enable chronyd
docker中运行chrony
root@mgt01:~# systemctl cat chrony
# /etc/systemd/system/chrony.service
[Unit]
Description=Network Time Service
Wants=docker.socket
After=docker.service

[Service]
User=root
ExecStart=/usr/bin/docker run \
  --restart=on-failure:5 \
  --net=host \
  --privileged=true \
  -v /etc/chrony.conf:/etc/chrony/chrony.conf \
  -v /var/run:/var/run \
  --name=chrony-container \
  docker.inspur.com:5000/library/cke/ntpd/chrony:v3.0.2-2 \
  /bin/bash -c 'rm -rf /var/run/chronyd.pid && rm -rf /var/run/chrony && /usr/sbin/chronyd -d -s'
ExecStartPre=-/usr/bin/docker rm -f chrony-container
ExecStop=/usr/bin/docker stop chrony-container
Restart=always
RestartSec=15s
TimeoutStartSec=30s

[Install]
WantedBy=multi-user.target